Dear all,
I have no clue if this is the right topic for such kind of information but because I've struggled for some time to bring Atom, racer and rust-language support together under Win32 I thought it could be of some value to other Win32 devs if I write it down.
Some time ago I've tried to activate the Rust code completion under Atom. Sadly, it didn't work on my machine so I informed the maintainers about this issue: Not working on Windows 8.1x64 · Issue #45 · edubkendo/atom-racer · GitHub
At this time I used a pre-1.0 version of Racer and Atom v.1.0.
The problems were two fold: the code completion was not fully active (only certain namespaces were shown) and I always had to press CTRL+SPACE to activate it.
Of course, such workflow isn't very productive so I gave up...and went back to Sublime3 ![]()
Now, a few days ago Racer got updated to version 1.0 and I tried to install all components again. And it worked! ![]()
My set-up consists of following components:
a) Atom 1.0.3 editor https://atom.io/
b) rust-language support: language-rust
c) racer-addin for Atom: racer
d) racer itself: https://github.com/phildawes/racer
e) build-addin for Atom (to get nice Cargo.toml support under Atom): build
Installation/Config steps are as follows:
a) Atom install package needs to be downloaded, the rest is just Win32-typical click/click/click ![]()
b) Now, go to the Settings-page and under Install type "rust" and install the package "rust-language" from the list of available packages.
c) Then go to the Racer github pages (the binary, not the addin...this comes later) and clone the sources. For cloning either use "git clone" via Console, or a tool like this one: https://windows.github.com/
d) Build Racer with cargo build --release and move the whole target/release directory to your preferred path. On my machine I have it under C:\bin

e) Now, install the racer support under Atom. Again, go to Settings/Packages/Install and type "racer".
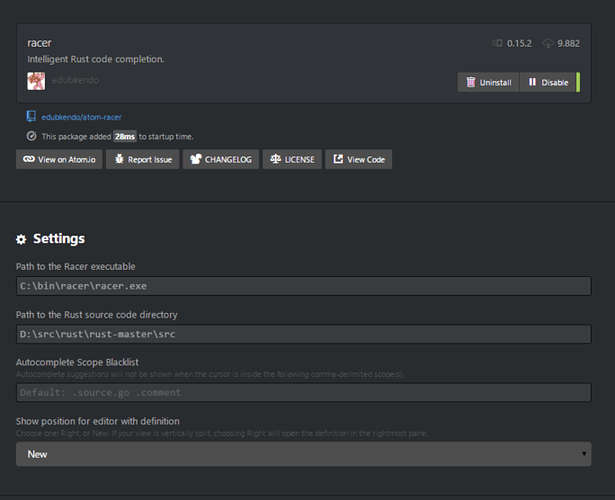
f) Configure the Racer-Addin by clicking on it in the Settings/Packages list and selecting its own Settings option. You'll see a list like this:
We see that Racer-Addin needs two paths, one of the racer binary you just compiled but also the path to the Rust sources itself. Racer needs this path to provide you the nice code-completions. Therefore, you must clone Rust sources from GitHub. In my case I was using the stable branch. You can decide on your own which sources you'll use. What's important is that you point to the /src sub-directory of the Rust-source tree.
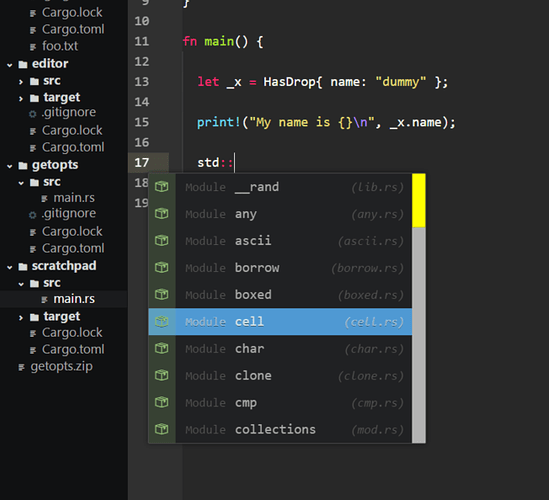
So, after having completed all this steps the code completion will work:
But, this is not the End (...my only friend, the End....The Doors) ![]()
We also want to use Cargo directly from Atom ![]()
Luckilly, there's an incredibly cool package capable of compiling different sources/project types. And it understands Cargo.toml!
Atom Build: build
Install it via Settings/Install then go to its own Settings page and activate/deactivate options according to your preferences (save-on-build, build-on-save, auto-scroll-on-error etc.)
Now you'll be able to execute an existing Cargo.toml via CTRL-ALT-B (or by any other key-combination you set up)
But, sometimes one would like to quickly compile a single *.rs file without creating a complete project. I myself often want to execute some nice scripts because I'm still learning the language, so there's really no need for me to always set-up a complete project just to get some "hello world" executed.
Therefore I created this .atom-build.json config file for Atom-Build which I put into a root directory where all my "single-rust-sources" live.
{
  "cmd": "rustc",
  "args": [ "-v","{FILE_ACTIVE}", "--out-dir", "{FILE_ACTIVE_PATH}" ],
  "sh": false,
  "cwd": "{PROJECT_PATH}",
  "errorMatch": "^(?<file>[^\\.]+.rs):(?<line>\\d+):(?<col>\\d+)",
  "keymap": "alt-c"
}
This file instructs the Atom-Build package to take care of the current active file and feed the rustc compiler with it. The output (that is, the win32 EXE file), will be placed into the directory where the source file lives.
Now, when I hit ALT-C my single source file gets compiled and the rust-output is placed under the same path:


For more information on different Options/Flags of the Atom-Build Addin, please, consult their nice docs: build
This is it.
I hope this little intro will be of some value to other Win32 developers.
Best regards,
Harris


