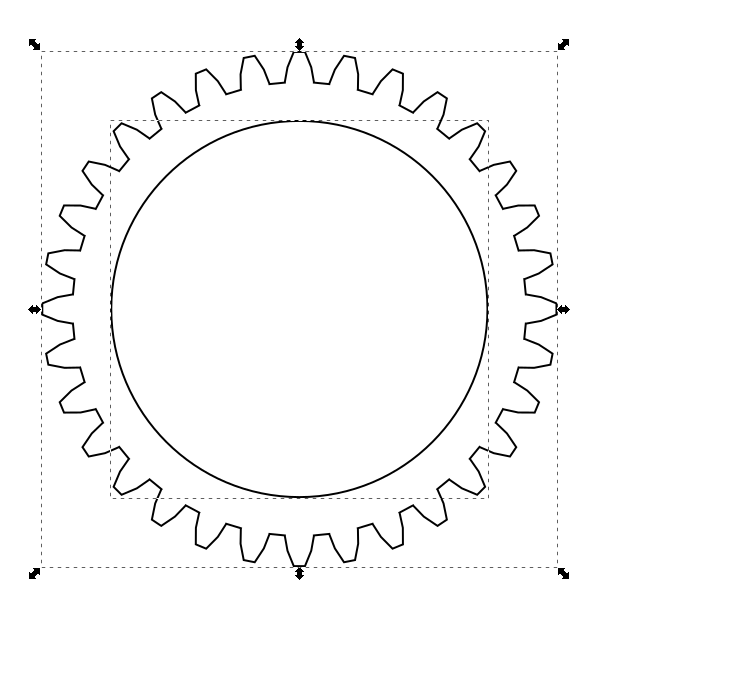
Don't try to remove the R. Just make the gear shape from scratch in Inkscape. It has a super simple extension for rendering gear designs under Extensions>Render>Gear. You'll be able to get close enough to the main shape and then add the inner teeth to complete the effect. Values of 32 teeth, 24 circular pitch, 20 pressure angle, and 190px diameter center hole seemed pretty close.
Render the gear as above using values of your choice.
Select the gear and ungroup the paths.
Duplicate the inner circle path.
Select one of the inner circle paths and the outer gear teeth path and do Path>Difference.
For the inner teeth, make one shape for the inner teeth.
Duplicate the tooth x4.
Select all five teeth at once, then select inner circle path from step 3.
Do Object>Arrange>Polar Coordinates>Last selected circle/ellipse/arc to place each shape along the circle at the precise intervals.
Delete the inner circle path.
You can then use your path functions (union, combine, difference) to create a single path with your desired shape.
When the extension draws the gear it draws two paths and groups them. When you select the gear look at the bottom. It will say "Group of two objects selected" or something similar. Ungroup the two paths.
I managed to remove the R:
I uploaded it as SVG here: https://ufile.io/dzmnc (the link expires in 30 days). Inkscapes gear tool doesn't resemble the original logo as closely.
In case you're interested, actix and xi-editor use a variation of the Rust logo in their logos.
I inserted a smaller circle in the gear, and subtracted it from the path. Then I removed the unnecessary vertices and moved them around to form a circle.
In the process, the measurements must have changed somehow. I also noticed that the coordinates got more decimal places, which seems to be almost unavoidable when working with Inkscape.
I found a way to remove the remove the R, without applying any transformations. The inner path is, except for the bulges, a near-perfect circle. The rest is identical to the original: Here's the new link.
Curious what your method was. Maybe: create an circle path the diameter of the inner circle of the gear shape. Duplicate it. Duplicate the gear shape and cut just one of the inner bulges from that.Subtract the circle from the gear. then apply duplicates of the bulge around the other inner circle and finally marry it all back together?
Actually, this time I deleted all the vertices of the R, until it looked like this:
Then I opened the three sub-paths and merged them back together into one big sub-path. I'm not sure how these tools are called in English, but they're on these buttons:
To get the circle shape, I just inserted a semi-transparent circle at the right position, and then moved the vertices and control points of the gear around until the paths aligned.
I noticed that Inkscape applies matrix transformations every time two paths are merged, subtracted, etc, which I wanted to avoid.


